Blog Candy Winner

Well, I’ve had SO MANY comments on my post for the October Pals “Trick or Treat” Blog Hop.  THANK YOU SO MUCH for your wonderful, kind words.  I treasure each & every one of my readers and your comments mean more to me than I can say.

I used Random.org to generate a random number, and counted my comments in the order they were posted to pick a winner for the Blog Candy giveaway.

And the winner is…(drumroll please!):

Sandi | October 9, 2012 at 10:37 AM |

“Such cute treat holders, they can be used and loved by young and old. The chocolate will sure help. Thanks for sharing.”

Sandi:  you have 24 hours to email me (Nancy@MyStampinSpace.com) your US mailing address and I’ll get those goodies in the mail to you right away!

For all the others who left me comments and wanted to know how to make these treat holders, I have recorded a video with step by step instructions and cutting dimensions. For my readers who order this on-line video tutorial in October, I’ll cut the price in half!  You’ll have lifetime access to the video so you can create these treats for any holiday or occasion.  To order the video, click here or click on the On-line Classes button to the right.  You’ll get the access code to the video delivered right to your inbox, easy-peasy, right?  So don’t wait, order your class today.

Happy Stampin’!

Nancy

October Pals Blog Hop

Trick-or-Treat! It’s time for some fun and festive crafting with the Stampin’ Pretty Pals! You’ve probably hopped over from Sandra Conner at Pretty Provisions, I’m stop number 22 on the Pals Hop and I’m glad you hopped in! I’ll help you “hop along” from blog to blog where you’ll find great ideas for Stampin’ Up! Halloween projects along with some tricks and treats along the way! Should you hop off course, simply click on any of the links in the Pals Hop Line-up below and you’ll be back on track.

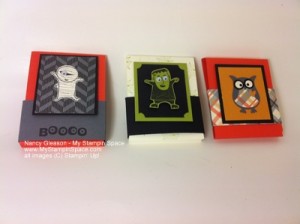
My Stampin Space treat holderCrafting & Chocolate are 2 of my favorite things – so when you combine them, how good is that? And today’s project incorporates both!

This matchbook style treat holder also uses my favorite color, Lucky Limeade, and my favorite stamp set of the day, Googly Ghouls.  It doesn’t get any better than this!

My Stampin Space treat holder projectThis photo shows the treat holder closed and the next photo shows it open, revealing the treat inside.

Perfect!

To purchase any of the supplies used to create this treat holder, feel free to click here to visit my secure on-line store.

Paper:  Lucky Limeade Cardstock, Basic Grey cardstock, Basic Black cardstock, Very Vanilla cardstock and Howlstooth & Scaringbone DSP.

Stamp Set:  Googly Ghouls

Ink:  Staz-On Black ink, Lucky Limeade Classic Ink Pad

Cool Tools:  Word Window Punch, Blender Pen, Score-Pal

Embellishments:  Googlies Adhesive Eyes

Adhesives:  Snail & Sticky Strip

I’m giving away a TREAT! Lucky you!

One lucky winner will receive this project AND  3 other treat holders for a total of four (4) Matchbook style treat holders AND instructions on how to make them!Pals October Blog Hop Blog Candy   This project is so versatile, you can make treats or party favors for just about any occasion.

If you’d like a chance to win, simply leave a comment below by Friday. One random winner will be announced here next Tuesday, so be sure to come back!
Note: I only ship within the U.S.   Winner has 24 hours to email me their name and mailing address so stay tuned for the announcement of the winner!

Now hop along for more tricks and treats and some spooky ideas from Barb Furlong at The Love of Stamping, stop number 1 on the Pals Trick-or-Treat Blog Hop! Thanks for “hopping” by!

  1. Barb Furlong at The Love of Stamping
  2. Kim Czenszak at Live Love Stamp
  3. Nicole Picadura at Scraps & Stamps
  4. Mary Fish at Stampin’ Pretty
  5. Beth Beard at My Little Craft Blog
  6. Peggy Noe at Prettypapercards.com
  7. Kerry Willard Bray at Stampgoodness
  8. Debbie Crowley at expressively deb…
  9. Naki Rager at …notes from Naki
  10. Sherrie Gross at Stampin Sunshine
  11. Claire Crotteau-Hutt at Stamppaperscissors
  12. Diane Roberts at Score at Four and a Quarter
  13. Laurie Chilton at Stampin’ Ink
  14. Katy McGloin at Just Fun Stamping
  15. Rae Harper at Wild West Paper Arts
  16. Brian King at Stamp with Brian
  17. Ann Schach at The Stampin’ Schach
  18. Nicole Watt at Impressions by Nicole
  19. Shannon Hokanson at My Stampin Blog
  20. Maggie Mata at Maggie Made Cards
  21. Sandra Conner at Pretty Provisions
  22. Nancy Gleason at My Stampin’ Space

Mojo Monday 262

Today is Monday, so it’s time to get my mojo on and  play the Mojo Monday sketch challenge.

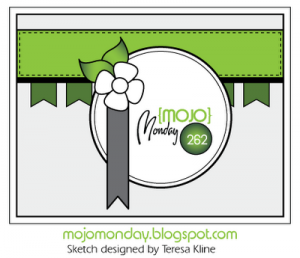
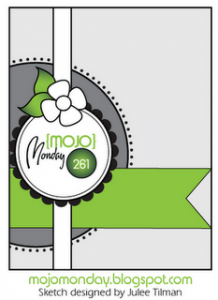
Here is the sketch that the design team over at Mojo Monday created.  I had so many ideas run thru my head the second I saw this sketch.  Since I had my Halloween stamps and paper out (for the Pals Blog Hop) I used those.

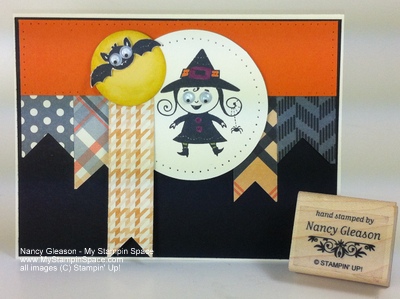
Here is my project – I hope you like it!  Googly Ghouls & Howlstooth & Scaringbone DSP

This sketch is a great way to use those little scraps of DSP that I always seem to accumulate but don’t want to get rid of (and I’m sure you have them too!).

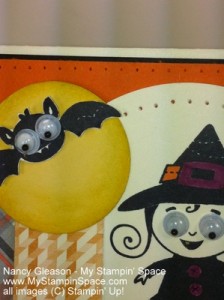
My card base is Very Vanilla cardstock with Basic Black layered on top of that.  A strip of Tangerine Tango crosses the top and acts as anchor for all the flags to hang from.  A circle of Very Vanilla acts as the canvas for my witch from the Googly Ghouls stamp set.  Both of those pieces have been pierced for added interest and texture.  You can see that better in this close-up.

Mojo Monday 262 close upI punched a circle in So Saffron and sponged Daffodil Delight around the outer edges to create shading.  The little bat flying over the moon adds to the ominous feeling!

I also used Rich Razzleberry, Pumpkin Pie, and Lucky Limeade markers to color in parts of my little witch.  The Googlie eyes just make the images in this stamp set so adorable!  Nothing frightening here!

If you like what you see, please leave me a comment.  You can even sign up to for my newsletter or to follow my blog so you don’t miss a post.

Thanks for stopping into My Stampin’ Space!  I hope you were inspired to get your mojo on and try your hand at making a project using your scraps of DSP and this sketch.

Happy Stampin’!  – Nancy


Mojo Monday 261

Well it’s Monday so you know what that means, it’s Mojo Monday!  Here is the sketch challenge for today and here is my interpretation.


I had to use the Christmas Ornament Keepsake stamp set.  I’m so pumped up about the promotion Stampin’ Up! announced this morning.  When you purchase this stamp set (or stamp set bundle with the coordinating dies) AND the Christmas Candlelight Designer Series Paper, you’ll get the paper piercing set for FREE!  Head over to my Promotion Page to get all the details on this offer.

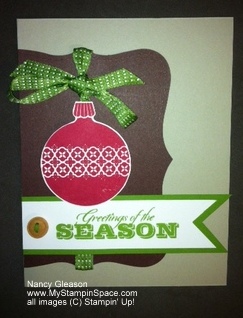
I started with Sahara Sand as my card base and Chocolate Chip die cut with the top note die and tied a piece of Gumball Green 3/8″ stitched satin ribbon around that layer.  Raspberry Ripple was used for the ornament and my paper snips made an easy job of cutting out the shape.  Gumball Green paper and ink were used to create the banner.  Of course, my 1-1/4″ square punch created the flagged end.  The sentiment is from Greetings of the Season.  A button finished things off just perfectly.

Thanks for stopping into My Stampin Space.  If you’d like to order any of the items used here, just pop on over to my secure online ordering site by clicking here. 

Come back soon, and until then, Happy Stampin’!

Nancy


Mojo Monday 260

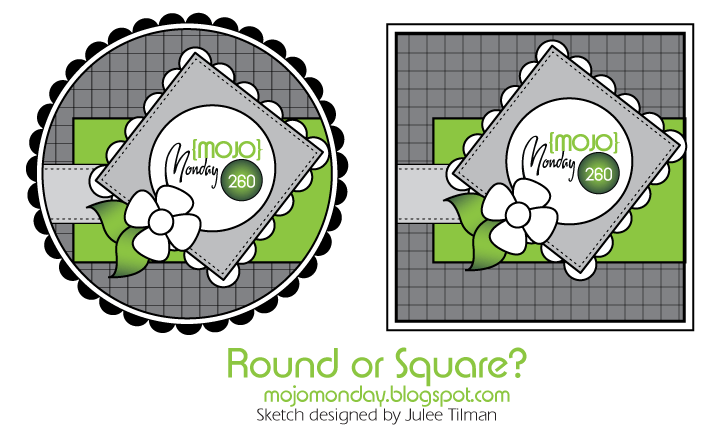
Today is Monday so it’s time for another sketch challenge from Mojo Monday!  Since it’s the last day of the month, we have the option of making either a round or square card.

Here’s the sketch: http://4.bp.blogspot.com/-W3_o8bbk5nQ/UF-pCtA9thI/AAAAAAAAJxQ/lRmIp_cXh0U/s1600/Mojo260Sketch.gif


And here is my entry:  Mojo Monday 260

And guess what?  I didn’t use a single sheet of paper, or ink, or punches or stamps!   I created the entire card using MDS2, our digital design software.

I am having SO MUCH FUN playing with MDS2!  And you can too – without any risk!  You can try this software without any obligation for 30 days with our risk free trial.  Whether you have ever used a digital design software before or not, the learning curve is so easy.  So what are you waiting for?  Give it a try right now.  Click here to download the full software program for free and let the next 30 days show you how fun and easy this is.

Thanks for stopping by My Stampin’ Space.  Come back again, and until then, Happy Stampin!  (and Happy Digi-Stampin’ & Digi-Scrappin’!)

Nancy

Christmas Ornament Medallion

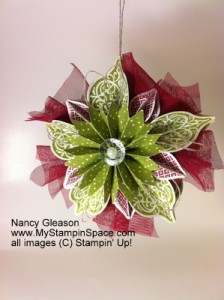
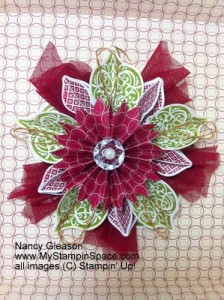
I’ve promised my facebook fans that I would post pics of my interpretation of the Christmas ornament on the cover of Stampin’ Up!’s holiday catalog.  So, without any further adieu, here we go!

Holiday catalog cover ornament
Candlelight Christmas Ornament
Holiday Cover Christmas Ornament

This is my first attempt.  It was very easy, just time consuming!  I did not have the exact paper that was used for the rosette so I just used what I had!  I think it looks nice.

This is my 2nd creation.  As you can tell right away, I used a totally different paper for the rosette.  What you may not notice immediately is that I used a gold metallic cord rather than linen thread to dress it up a little.  Then, I lined a shadowbox frame with more of my DSP and I framed the Ornament Medallion!  What a great way to preserve this beautiful handmade creation!

Back of the Christmas Ornament Medallion
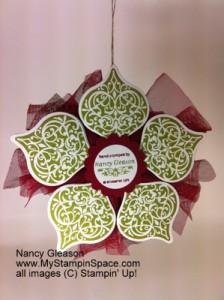
The Back

I dressed up the back (of the ornament being hung, not framed!)   You can use this space to sign your artwork or use to convey a message to the recipient of your gift!


If you want to recreate this on your own, a supply list is below.

 Ornament Keepsakes stamp set (clear or wood mount) and coordinating Framelits Dies.  Buy the bundle & save!  Clear # 128051 or Wood # 128048
Scalloped Tulle RibbonCherry Cobbler # 127841
Ink:  Old Olive Ink Pad, Cherry Cobbler Ink. 
Paper:  Whisper White or Very Vanilla Cardstock
Candlelight Christmas Specialty DSP # 126901 (or substitute with a DSP that you have on hand)
Embellishments:  Vintage Faceted Designer Buttons, Large Pearl Basic Jewels, Linen  Thread.
Cool Tools:  Big Shot machine & the Designer Rosette Bigz  XL die # 125594, or a Simply Scored tool to score the DSP to make your own Rosette.
Adhesives:  I recommend using the Multipurpose Liquid Glue # 110755 and a hot melt glue gun.
 
 Thanks for stopping by My Stampin Space.  I hope you like what I created and that you are inspired to create this for yourself!  If you do, just click here or on any of the underlined products listed above to go right to my online secure ordering site. 
Happy Stampin!
Nancy

Stampin’ Up! Halloween Spooktacular Starter Kit Special!

Stampin’ Up! Halloween Spooktacular Starter Kit Special!

B1LP_Spooktacular_ProjectKit_Aug0112_NA
I WANT IT NOW!  Purchase the Stampin’ Up! $99 Starter Kit and receive everything you need to complete the Halloween Printer’s Tray Project Kit (up to a $60 value) featured above as a FREE product bonus!  Due to high demand, this offer has been extended through September 16.

The Halloween Spooktacular Project Kit includes:

  • Black Tray w/handle
  • Toxic Treats stamp set in choice of wood or clear-mount and English or French.  Prefer your Halloween sentiment stamps in Spanish?  You have the option to choose  Spooky Bingo Bits in Spanish instead of Toxic Treats.
  •  1 Pack of Bakers Twine in Lucky Limeade
  • 1 Pack of Basic Jewels Rhinestones
  • 2 – 12×12 sheets made with My Digital Studio. Images include rectangular shapes of DSP from Howlstooth & Scaringbone, Old Olive, Pumpkin Pie & More Mustard CS. Images of all the inserts, flags, pennants and bats, etc.  All papers included are MDS digital images.
  • Laser cut spider web, pennant and flag in Silver Glimmer Paper
  • 6 buttons – 1 Vintage Faceted Designer, 2 Basic Gray, 2 Pumpkin Pie and 1 Old Olive
  • Glue Dots Adhesive
  • Ribbon – Very Vanilla Seam Binding, approx 18″ in length and 1/2″ Black & Gray Striped Satin Ribbon, approx 36″ in length.
  • Ink and clear blocks not included.

IMPORTANT UPDATE:   The black printer’s tray and project kit are now shipping with the Starter Kits.

6a00e54f95df9288340168eafac7de970c-500wi

The $99 Stampin’ Up! Starter Kit is a hobby stamper or business demonstrator’s paper crafting dream come true! In addition to the Spooktacular product bonus, here are my favorite reasons to get the Stampin’ Up! starter kit and become a member of my Stampin’ Pals Group:

  • YOU CHOOSE:  For $99 you get $125 worth of YOUR CHOICE of ANY current products in the Stampin’ Up! Catalog.
  • FREE SHIPPING:  The starter kit ships to you FREE, another 10% savings.
  • I LOVE THIS CATALOG:  You’ll receive 8 copies of the annual catalog as part of your kit.  Share with friends, customers or keep one in every room.  The catalog is THAT good with it’s clean and simple design, pretty samples and oodles of stamp choices.
  • TAKE A TEST DRIVE:  Test out demonstrator discounts and benefits from the time you purchase your kit through the Dec. 31.  There’s no obligation to purchase anything further but the discounts are dishy if you do!
  • FILL YOUR WISH LIST:  Enjoy a 1 time benefit of 30% off your first demonstrator product order of $150 or more (placed within 45 days).  Stock up on the new,  redesigned foam ink pads (better ink coverage and stay juicy longer), stamps and coordinating accessories.
  • EVERYDAY DISCOUNT:  You’ll receive an everyday 20% discount on anything you purchase while you remain active.
  • PRE-ORDER:  Purchase Stampin’ Up! products one month in advance of a customer sales period.  Cool.
  • RESOURCES:  Stampin’ Up! offers a monthly magazine, private website and gallery, video tutorial library and more.
  • JOIN MY STAMPIN’ PALS.  Purchasing the kit through me gives you instant access to exclusive our private group resources, friendships and fun!

Again, there’s no risk, no obligation to purchase anything further and no penalty to drop!

READY TO GET STARTED?  CLICK HERE  to order your kit on-line and become part of the my group  and the Stampin’ Up! family.

Please EMAIL ME (nancy@MyStampinSpace.com) if you have any questions.  I’m here to help!

Pals Paper Arts 142

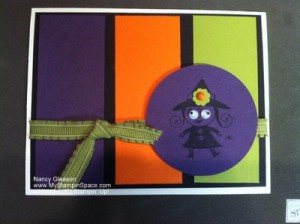
This week the Pals are getting together to play with a  color challenge.  What a great trio of colors; so many possibilities.

PPA142

With my new favorite stamp set, Googly Ghouls in hand, I crafted this little card.  I’m loving the color combination.

"Pals paper arts", "Googly Ghouls", "Halloween"I love how the images in this stamp set are designed to be used with the googly eyes.  What a fun touch!  I also added a little flower on her hat for fun too!

My recipe is below and remember you can order of of the items that are underlined just by clicking on them or click here to go to my online ordering site.

Stamp Set:  Googly Ghouls #128063 (clear mount), # 128060 (wood mount)

Paper:  Whisper White, Basic Black, Elegant Eggplant, Pumpkin Pie, Lucky Limeade card stock

Ink:  Black Staz-On

Cool Tools:  Big Shot die cutting machine, #2 Circle Die, Itty Bitty Shapes Punch Pack

AccessoriesLucky Limeade Ruffled Ribbon, Googly Eyes, Brights Brads

Thanks for stopping by My Stampin’ Space.  Like me on facebook and come back often!

BACK TO SPOOL TIME

What color will you choose?  Why decide when you can get them all!  During September you can recieve a FREE spool of 3/8″ stitched satin ribbon in one of our newest colors with every $40 in products (excluded tax and freight) you order.

Gumball Green 3/8 Stitched Satin Ribbon        Midnight Muse 3/8 Stitched Satin Ribbon            Summer Starfruit 3/8 Stitched Satin Ribbon

GUMBALL GREEN             MIDNIGHT MUSE           SUMMER STARFRUIT


Primrose Petals 3/8 Stitched Satin Ribbon                Raspberry Ripple 3/8 Stitched Satin Ribbon

PRIMROSE PETALS              RASPBERRY RIPPLE

So, order $40 in Stampin’ Up! products and choose 1 spool of FREE RIBBON,
Order $80 of products  choose 2 spools of FREE RIBBON,
Order $120 of products and choose 3 spools of FREE RIBBON,
Order $160 of products and choose 4 spools of FREE RIBBON AND receive
$25 in FREE MERCHANDISE.
Order $200 of products and get all 5 colors of FREE RIBBON AND receive            $30 in FREE MERCHANDISE!

It doesn’t get any better than that!  Click here to go to my secure on-line ordering site and place your order.


Mojo Monday 256

Is it really Thursday already?   Really, where did the week go?  I didn’t have the time to get started on this Monday night but I did start my card on Tuesday but here it Thursday and I just got finished!   It’s been a busy week, that’s for sure!

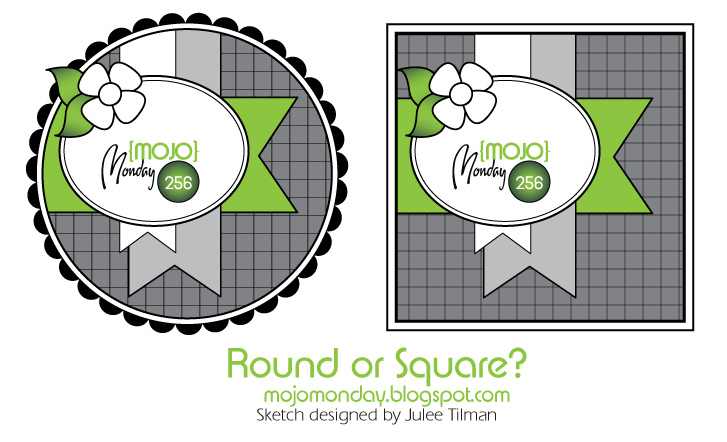
Well, here is the sketch:  We had a choice of either a round or square card.  http://3.bp.blogspot.com/-7C-CnFpELoE/UDq7hP1RIDI/AAAAAAAAJM4/OGjWUTs6tfE/s1600/Mojo256Sketch.gif

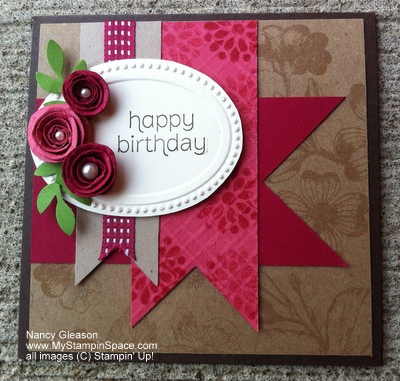
I made my card square, it was really fun making a card a little different than the standard 5-1/2″ x 4-1/4″ size.

This card is destined for a friend who is having a birthday tomorrow!   Good thing I finally got it finished is all I can say :).

Stampin' Up!, Nancy Gleason, Natural Composition DSP, Made For You, Primrose Petals,

Please leave me a comment and let me know how you like this card.  My recipe is below:

Stamp Set:  Made For You # 126342 (clear mount)

Paper:  Early Espresso card stock, Natural Composition Specialty DSP, Primrose Petals, Raspberry Ripple, Very Vanilla, Gumball Green.

Ink:  Early Espresso

Cool Tools:  Big Shot die cutting machine, Textured Impressions Designer Frames embossing folder, Build-a-Bird Punch, 1-1/4″ circle punch, 1-3/8″ circle punch, paper snips

Embellishments:  3/8″ Stitched Satin Ribbon in Raspberry Ripple, Basic Jewels – Pearls.

You can click on either of the items above that have hot links to go directly to that item in my online store, or you can click here to go to my secure online ordering.

Like me on Facebook and be social – tell your friends to like me too!

Thanks for stopping by My Stampin Space.   Come back soon.

Nancy


Mojo Monday 256

The Dies really are ‘to die for’!

One of the things I love most about Stampin’Up!  is the coordination of product!  They make it sooo easy to create perfectly coordinated products.  Many of the stamp sets have punches or dies to cut out the stamped shaped.  Yes, you can can still use paper snips to fussy cut your shapes but this can be time consuming and it’s not always an exact science (although it is just plain fun sometimes)

Perfectly Preserved Clear-Mount Bundle

I have to admit I wasn’t quite ‘sold’ on the Orchard Harvest product suite when I first saw it (pg. 28 & 29 in the holiday catalog) but once I started seeing all the possibilities of this set, I really looked at it differently.  Well, I got the stamp set – nothing else in this product suite, just the stamp set.  And while I do love it, I wish I had the dies too (and the paper).

I made the following card and actually cut out the shapes by hand.  Not so bad on the jar lid and pears, but cutting the INSIDE of the jar shape – through 4 layers of paper – NOT EASY!  And although I think I hid it well enough, it wasn’t very exact either!  I sure was wishing I had the dies to cut this out – it would have been easy-peasy.

Perfectly Preserved...for you!  So, guess what’s going on my next order?

Yup, the Cannery Set framelit dies.

If you want them, order the bundle, it’s designed to save money.  Click on any of the items below to go directly to my online store where you can order securely 24/7.  And don’t make the same mistake I did, get both at the same time!

The Perfectly Preserved Bundle consists of the Perfectly Preserved Stamp Set  and the Cannery Set Framelit dies in wood mount #129943 , and in clear mount #12994.

I used Whisper White cardstock for the base, and I pulled out a sheet of retired Pear Pizzaz (well, because of the pears) for the background.  The designer printed paper is from the Floral District DSP collection on top of a sheet of Crumb Cake card stock which was edged with the Finishing Touches Edgelits. The pears were stamped in Pear Pizzaz ink and Summer Starfruit ink and stems in Chocolate Chip ink.  The cap was stamped in Marina Mist ink and accented with a piece of Linen Thread and popped up on Stampin’ Dimensionals.  To create the jar, I stamped the image in Black Staz-On ink onto a Window Sheet.  The pears are behind the window sheet to give the illusion they are in a glass jar.  The sentiment was stamped and then cut out using the Bitty Banners Framelits die (which I do have).  You can see how perfectly coordinated the stamp image is to the die cut shape.

So what you think about the Orchard Harvest product suite?  Leave me a comment and let me know.  I’d love to hear from you.

Thanks for stopping by My Stampin’ Space.  Come back again soon, (bookmark my page and/or subscribe to my RSS feeder – that’s the little orange button to the right) and until then, Happy Stampin’!

Nancy


Mojo Monday 255

Well yesterday was Monday so that means another sketch challenge from Mojo Monday!  I wasn’t able to get into My Stampin’ Space to play & create until late last night so here’s my Mojo Monday post – on Tuesday!

Here’s the sketch:

And here’s my card!

Since summer is rapidly drawing to a close, I thought using the Summer Smooches DSP would be a great tribute to Summer and the Daffodil Delight Ribbon would add the perfect summery finishing touch!  Of, course the sentiment “Live in the Sunshine” pays tribute to our summer sunshine too!

If you would like to buy any of the products I used on my card, the product names in my card recipe below are hot links to my online ordering.  Just click on any item and you’ll go right to that item.  If you want to browse the catalogs, just click on the catalog cover icons on the right.

Thanks for stopping into My Stampin Space.  If you like what you see, sign up for my Customer Newsletter where you’ll stay informed on promotions, tips & trends.  And don’t forget to LIKE me on Facebook and share with your friends!

Paper:  Whisper White cardstock, Baja Breeze cardstock, Lucky Limeade Cardstock, and Summer Smooches DSP.

Stamps:  Pursuit of Happiness

Ink:  Island Indigo Classic Ink Pad

Embellishments:  Daffodil Delight 1/4″ Stitched Ribbon, Designer Printed Brads in Island Indigo.

ToolsBig Shot die cutting machine, and Adorning Accents Edgelits

Fabric anyone? 90% off

Stampin’ Up! has just done something unprecented….they’ve taken 4 of their fabric offerings and put them on sale for only 99 cents!

Below are thumbnails of the fabric collections that are on sale for only $.99, the regular price is $9.95.  Don’t forget to check out all the coordinating ribbon and buttons too.

Click here to access the clearance rack on my website.

You can order securely from my website but all of the items on the clearance rack are first come, first serve and when an item is sold out, it’s gone for good.  So hurry up and get your order in while you still can!

Sweet Stitches Designer Fabric

Sweet Stitches Designer Fabric 121818
Price: $0.99

Springtime Vintage Designer Fabric

Springtime Vintage Designer Fabric 121817
Price: $0.99


Deck the Halls Designer Fabric

Deck The Halls Designer Fabric 121716
Price: $0.99


Candy Cane Christmas Designer Fabric

Candy Cane Christmas Designer Fabric 121715
Price: $0.99

My Digital Studio2 – the digital scrapbooking software by Stampin’ Up!

Well today, I got some practice in using MDS2 – oh my goodness! It is SO MUCH FUN! And never having used this before, I was able to jump right in and just start creating – there’s not much of learning curve. It’s that easy!
Anyway, I made a new blog header using MDS2 and a new “ORDER ONLINE” button and an “EMAIL ME” button. What do you think?

I purposely made the 2 buttons different because I want to know what YOU think! Do you like the Decorative Label punch shape or the Circle shape?  Please let me know.  I will be making both the same, but I will make them whichever shape my readers like best.  So speak up and leave me a comment with your favorite button style.

Now, speaking of MDS2 – there has been ALOT of hype waiting for the release of the upgraded version of MyDigitalStudio.  And I can see why and I’ve barely gotten my feet wet.  Want to learn more?  Watch the following video:

If you’d like to take MDS2 for a test drive, I can give you a free 30-day trial version.  As I am learning MDS2 myself, I will be recording videos and if you sign-up for the free trial version of MDS2 thru me, I’ll give you access to the tutorial videos and you can learn alongside me.  Hang on tight – I’ll give you info to download the free trial once I have some videos recorded.

Thanks for stopping by and letting me know what you think.  Feel free to share this with your friends, especially your friends who would like digital scrapbooking.  Until next time,

Happy Stampin!

Nancy


August Blog Hop

Glad you could join us for some holiday crafting with the Stampin’ Pretty Pals!  You’ve probably hopped over from Barb Furlong at The Love of Stamping, I’m stop number 16 on the Pals Hop and I’m glad you hopped in! I’ll help you “hop along” from blog to blog where you’ll find great ideas for Stampin’ Up! projects featuring the new Holiday Catalog! Should you hop off course, simply click on any of the links in the Pals Hop Line-up below and you’ll be back on track.

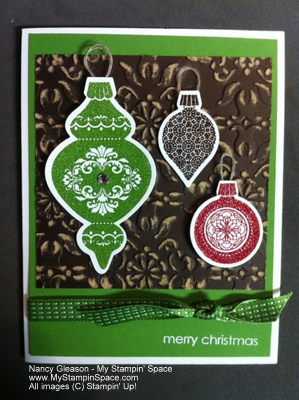
Stampin' Up! Ornament KeepsakesMy card features several new products from the Holiday catalog.  The first thing that caught my eye when I opened the catalog (actually when I first laid eyes on the cover) was the Ornament Keepsake stamp set and coordinating Holiday Ornaments Framelits Die.  These two items are available as a bundle to save you money.  Stampin’ Up! makes it easy-peasy to coordinate and now, with the bundles, you can save money too!

The other product that I just had to have was the Core-dinations Card Stock.  This specialty card stock has a different color core so when you emboss the paper, you can sand it and reveal the inside color – how cool is that?  I used the Core-dinations Card Stock in Early Espresso #127848, embossed with Vintage Wallpaper Embossing Folder # 120175.

I created my card base with Whisper White cardstock, then a layer of Gumball Green.  Next I adhered my Early Expresso layer that was sanded to reveal the inside layer.

I stamped my ornaments with Versamark ink and heat embossed them with Stampin’ Emboss Powder in Gumball Green # 128981, Early Espresso # 128980, and Cherry Cobbler # 122949.  Then I used my Big Shot die-cutting machine # 113439 and the Holiday Ornaments Framelit die # 127816 to perfectly cut-out the ornament shapes.

The sentiment is from Embellished Events #126497 (c) and this was stamped with Versamark & heat embossed in White.  A Rhinestone Basic Jewel tops off the large ornament. A piece of 3/8″ Stitched Satin Ribbon in Gumball Green ties everything together.

I hope you enjoyed my project; if you have to have any of these products, you order from my secure site by clicking on either the item listed above or click here.

Now hop along for more inspiring ideas from Naki Rager at My Stampin’ Blog, stop number 17 on the Pals Holiday Catalog Blog Hop!  Thanks for “hopping” by!

  1. Lynn Hoyt at Cattail Designs
  2. Shannon Jaramillo at ezpeasycards.com
  3. Debbie Pierce at Stampin Sunshine
  4. Jennifer Takacs at Stamped in Full
  5. Julie Trevett-Smith at The Stampin’ Affair!
  6. Cathy King at chattycathycardcreations
  7. Patti MacLeith at Papercrafts by Patti
  8. Beth Beard at My Little Craft Blog
  9. Rae Harper at Wild West Paper Arts
  10. Mary Fish at Stampin Pretty
  11. Kim Czenszak at Live Love Stamp
  12. Diane Roberts at Scoreatfourandaquarter
  13. Claire Crotteau-Hutt at stamppaperscissors
  14. Dawn Tidd at Tiddbits from Dawn
  15. Barb Furlong at The Love of Stamping
  16. Nancy Gleason at My Stampin’ Space
  17. Naki Rager at My Stampin’ Blog
  18. Brian King at Stamp with Brian
  19. Kim Luithle at Kim’s Stampin Stuff
  20. Mikki Sarkisyan at Mikkis Creative Corner
  21. Angela Curry at Kindred Stampers
  22. Maggie Mata at Maggie Made Cards
  23. Susan Lankford at Stamp and Scrap With Susan
  24. Nicole Watt at Impressions by Nicole
  25. Bobbi Mangas at My Therapy
  26. Angie Blake at Angies Musings
  27. Kris Kilcoyne at Kween Bee Kreations
  28. Nicole Picadura at Scraps & Stamps
  29. Sherrie Gross at Stampin Sunshine
  30. Nina Dee at Deesigns by Nina Dee

Thanks to our talented Pal, Nicole Watt for the impressive Blog Hop Badges & Buttons she designed using MDS2 and our Orchard Harvest suite of products available in the Holiday catalog.